
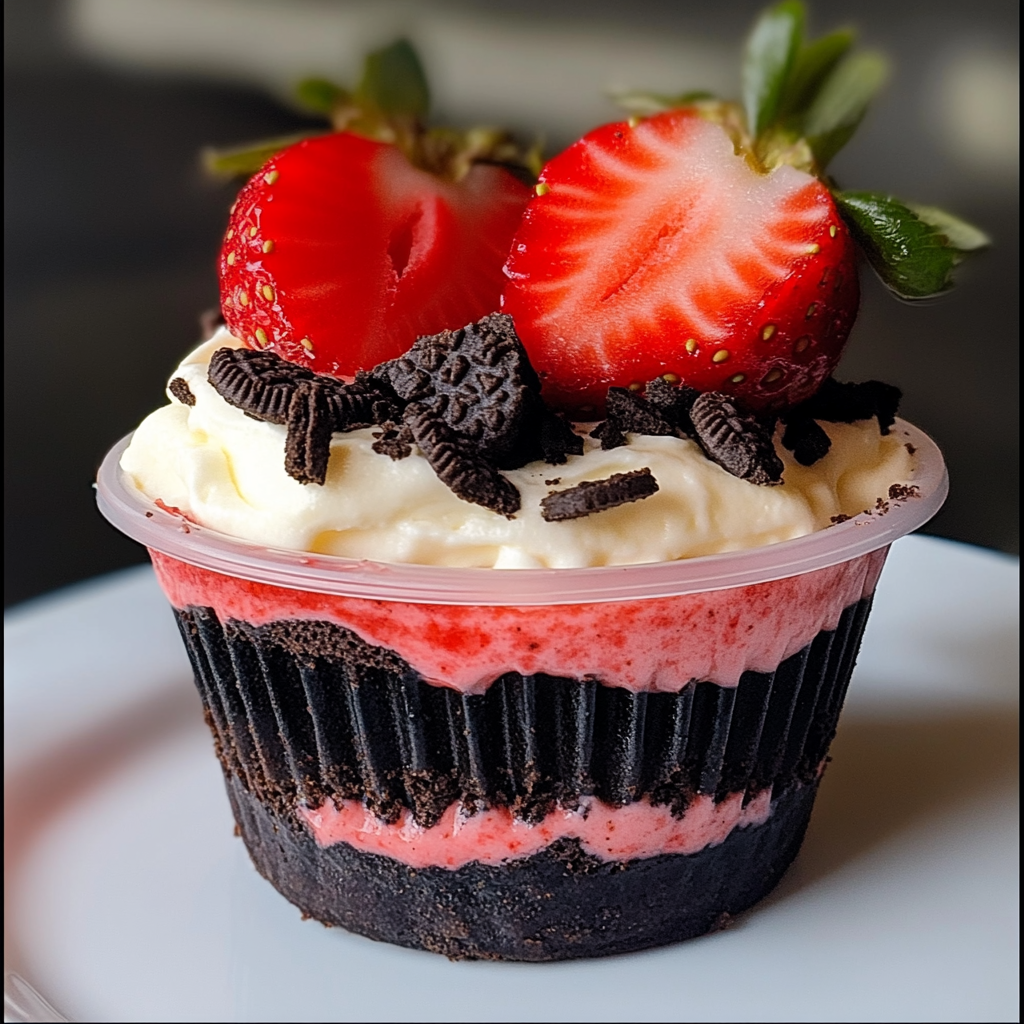
Picture this: the sun is setting, casting a warm golden glow across your kitchen. A gentle breeze whispers through the open window, carrying the sweet scent of freshly cut strawberries. You’re craving something indulgent, something that captures the essence of summer, but you don’t want to spend hours slaving away in the kitchen. That’s where these delightful Strawberry Oreo Cheesecake Cups come in. They’re the perfect treat for a warm evening, a casual get-together with friends, or even just a little “me time” indulgence. These individual desserts combine the classic crunch of Oreo cookies with the creamy richness of cheesecake and the bright, refreshing burst of fresh strawberries. It’s a flavor combination that’s both familiar and exciting, guaranteed to bring a smile to your face.
These Strawberry Oreo Cheesecake Cups aren’t just a recipe; they’re a little bit of sunshine in a cup. They’re inspired by my grandmother’s love for simple, yet delicious desserts. She always had a knack for creating treats that were both comforting and celebratory. These cups remind me of her – sweet, vibrant, and full of joy. So, grab your ingredients, and let’s create a little magic in the kitchen!
The Magic Behind the Layers: Unveiling the Ingredients
The beauty of these Strawberry Oreo Cheesecake Cups lies in their simplicity. Each layer plays a crucial role in creating a harmonious blend of textures and flavors. Let’s break down the ingredients that make this dessert so irresistible:
Oreo Crust Layer: The Foundation of Deliciousness
- 20 Oreo cookies, crushed: The iconic chocolate sandwich cookie provides a rich, chocolatey base that perfectly complements the creamy cheesecake filling and the sweet strawberries. The slight bitterness of the Oreo balances the sweetness of the other components.
- 4 tbsp unsalted butter, melted: The melted butter acts as a binder, holding the Oreo crumbs together to form a sturdy and delicious crust. It also adds a touch of richness and buttery flavor.
Cheesecake Filling: Creamy Dreaminess
- 8 oz (1 block) cream cheese, softened: The star of the show! Cream cheese provides the signature tang and creamy texture of cheesecake. Make sure it’s softened to room temperature for a smooth and lump-free filling.
- ½ cup powdered sugar: Powdered sugar sweetens the cheesecake filling and adds a delicate, melt-in-your-mouth texture.
- 1 tsp vanilla extract: Vanilla extract enhances the overall flavor profile, adding a warm and aromatic note to the cheesecake filling.
- 1 cup heavy whipping cream, cold: Cold, heavy whipping cream is the secret to achieving a light and airy cheesecake filling. When whipped, it adds volume and creates a luxurious, cloud-like texture.
Strawberry Layer: A Burst of Freshness
- 1½ cups fresh strawberries, diced: Fresh strawberries bring a vibrant burst of sweetness and a touch of tartness, cutting through the richness of the cheesecake filling. Choose ripe, juicy strawberries for the best flavor.
- 1 tbsp granulated sugar (optional, for extra sweetness): Depending on the sweetness of your strawberries, you can add a tablespoon of granulated sugar to enhance their natural sweetness. This is entirely optional and can be adjusted to your preference.
Crafting the Cups: A Step-by-Step Guide
Now that we’ve gathered our ingredients, let’s dive into the fun part: creating these delightful Strawberry Oreo Cheesecake Cups! The process is simple and straightforward, even for beginner bakers.
Step 1: Prepare the Oreo Crumble – The Crunchy Canvas
- Crush the Oreos: The first step is to transform those classic Oreo cookies into a crumbly base. You can achieve this in two ways: using a food processor for a quick and even crush, or placing the cookies in a ziplock bag and using a rolling pin to crush them manually. Both methods work perfectly well. Aim for fine crumbs, ensuring a smooth and compact crust.
- Combine with Butter: Once you have your Oreo crumbs, transfer them to a bowl and pour the melted butter over them. Mix thoroughly until the crumbs are evenly coated with butter. This will create a mixture that holds together beautifully, forming the base of your cheesecake cups. Set this mixture aside.
Step 2: Make the Cheesecake Filling – The Heart of the Dessert
- Beat the Cream Cheese: In a mixing bowl, beat the softened cream cheese until it’s smooth and creamy. This is a crucial step to avoid any lumps in your cheesecake filling.
- Add Sugar and Vanilla: Add the powdered sugar and vanilla extract to the cream cheese and continue beating until everything is well combined and the mixture is smooth and creamy.
- Whip the Cream: In a separate bowl, pour the cold heavy whipping cream. Using a hand mixer or a stand mixer with the whisk attachment, whip the cream until stiff peaks form. This is the key to achieving a light and airy cheesecake filling. Don’t over-whip, or you’ll end up with butter!
- Fold it All Together: Gently fold the whipped cream into the cream cheese mixture. Be careful not to overmix, as this can deflate the whipped cream and result in a dense filling. Folding ensures a light and airy texture.
Step 3: Prep the Strawberries – The Jewel-Toned Topping
- Dice the Strawberries: Wash and hull the fresh strawberries, then dice them into small, bite-sized pieces.
- Sweeten (Optional): If your strawberries aren’t particularly sweet, you can sprinkle them with a tablespoon of granulated sugar. This will draw out their natural juices and enhance their sweetness. Let them sit for about 5 minutes.
Step 4: Layer the Cup – The Art of Assembly
- Oreo Base: Begin by placing a layer of the Oreo crumbs at the bottom of each cup. Use a spoon or your fingers to gently press the crumbs down, creating a compact base.
- Cheesecake Filling: Spoon a generous dollop of the cheesecake filling over the Oreo crust. Smooth it out slightly to create an even layer.
- Strawberry Layer: Add a layer of diced strawberries on top of the cheesecake filling. The vibrant red of the strawberries will create a beautiful contrast against the creamy white cheesecake.
- Repeat: Repeat the layers – Oreo crumbs, cheesecake filling, and strawberries – until the cup is almost full. Finish with a final layer of Oreo crumbs and a few strategically placed strawberries on top for a visually appealing presentation.
Step 5: Chill & Serve – The Final Touch
- Refrigerate: Cover the cups and refrigerate them for at least 1 hour, or preferably longer, to allow the flavors to meld together and the cheesecake filling to set. Chilling also enhances the overall texture and makes the dessert even more refreshing.
- Serve: Once chilled, these Strawberry Oreo Cheesecake Cups are ready to be enjoyed! They’re perfect for any occasion, from casual gatherings to special celebrations.
Tips & Variations: Making it Your Own
- Individual Cups: Using individual cups makes portion control easy and adds a touch of elegance to your dessert. You can use clear glass cups, mason jars, or even disposable plastic cups.
- Oreo Variations: Experiment with different Oreo flavors, such as Golden Oreos or Mint Oreos, to create unique flavor combinations.
- Fruit Variations: Swap out the strawberries for other seasonal fruits, such as blueberries, raspberries, or peaches. A mixed berry combination would be absolutely delicious!
- Chocolate Ganache: Drizzle a little chocolate ganache over the top of the cups for an extra touch of indulgence.
- Whipped Cream: Add a dollop of freshly whipped cream on top of the finished cups for a beautiful and decadent garnish.
- Mini Cheesecakes: You can also make these as mini cheesecakes in a muffin tin with cupcake liners. Simply press the Oreo crumbs into the bottom of each liner and follow the recipe as directed.
A Sweet Ending: Sharing the Joy
These Strawberry Oreo Cheesecake Cups are more than just a dessert; they’re a celebration of simple pleasures and the joy of sharing delicious food with loved ones. Whether you’re enjoying them on a quiet evening or serving them at a party, these delightful treats are sure to bring a touch of sweetness to any occasion. So, gather your ingredients, follow the steps, and create a little bit of magic in your kitchen. And don’t forget to share your creations with friends and family – because the best part of baking is sharing the joy!
Strawberry Oreo Cheesecake Cup
- Total Time: 1 hour 20 minutes
- Yield: 4 servings
Description
Picture this: the sun is setting, casting a warm golden glow across your kitchen. A gentle breeze whispers through the open window, carrying the sweet scent of freshly cut strawberries. You’re craving something indulgent, something that captures the essence of summer, but you don’t want to spend hours slaving away in the kitchen. That’s where these delightful Strawberry Oreo Cheesecake Cups come in. They’re the perfect treat for a warm evening, a casual get-together with friends, or even just a little “me time” indulgence. These individual desserts combine the classic crunch of Oreo cookies with the creamy richness of cheesecake and the bright, refreshing burst of fresh strawberries. It’s a flavor combination that’s both familiar and exciting, guaranteed to bring a smile to your face.
Ingredients
Oreo Crust Layer:
20 Oreo cookies, crushed
4 tbsp unsalted butter, melted
Cheesecake Filling:
8 oz (1 block) cream cheese, softened
½ cup powdered sugar
1 tsp vanilla extract
1 cup heavy whipping cream, cold
Strawberry Layer:
1½ cups fresh strawberries, diced
1 tbsp granulated sugar (optional, for extra sweetness)
Instructions
1. Prepare the Oreo Crumble: Crush the Oreo cookies in a food processor or in a ziplock bag using a rolling pin until fine crumbs form. Mix with melted butter until evenly coated. Set aside for layering.
2. Make the Cheesecake Filling: In a bowl, beat the cream cheese until smooth. Add powdered sugar and vanilla extract, mixing until creamy. In a separate bowl, whip the heavy cream until stiff peaks form. Gently fold the whipped cream into the cream cheese mixture until well combined.
3. Prep the Strawberries: Dice the strawberries and sprinkle with a little sugar if desired. Let them sit for 5 minutes to release their natural juices.
4. Layer the Cup: Start with a layer of Oreo crumbs at the bottom of the cup. Add a generous dollop of the cheesecake filling. Sprinkle a layer of fresh strawberries. Repeat the layers until the cup is filled, finishing with Oreo crumbs and strawberries on top.
5. Chill & Serve: Refrigerate for at least 1 hour to let the flavors meld.
Notes
Individual Cups: Using individual cups makes portion control easy and adds a touch of elegance to your dessert. You can use clear glass cups, mason jars, or even disposable plastic cups.
Oreo Variations: Experiment with different Oreo flavors, such as Golden Oreos or Mint Oreos, to create unique flavor combinations.
Fruit Variations: Swap out the strawberries for other seasonal fruits, such as blueberries, raspberries, or peaches. A mixed berry combination would be absolutely delicious!
Chocolate Ganache: Drizzle a little chocolate ganache over the top of the cups for an extra touch of indulgence.
Whipped Cream: Add a dollop of freshly whipped cream on top of the finished cups for a beautiful and decadent garnish.
Mini Cheesecakes: You can also make these as mini cheesecakes in a muffin tin with cupcake liners. Simply press the Oreo crumbs into the bottom of each liner and follow the recipe as directed.
- Prep Time: 20 minutes
- Cook Time: 0 minutes